Wednesday, June 13, 2018

BAR Fleet- #114 Astron Alpha


An Alpha – At Long Last !!

 
I just happened to have this Estes PNC-50K nose cone rattling around for the past year in my parts box.  Whatever should I build with this component?  Heck, why not an Alpha?  Every model rocketeer should have one of these famous, historic birds in their fleet, even if it is a standard 3FNC beginner’s model. 

The Alpha became a side project to be worked on alongside the Lunar Patrol, a Satellite Interceptor, and others.

It’s funny, but I never owned an Alpha back in my old fleet days spanning 1973-1984. It was even the very first model rocket plan I ever laid eyes on as a 13 year old kid.  I had just come home from visiting NARAM-11 in August of 1969, and had a brand new ‘69 Estes catalog in hand – obtained directly from the Estes vendor table at that event.  In the center of the catalog was a Model Rocket Manual that contained plans, diagrams, and parts lists for building an Alpha.  And, of course, page 11 of the catalog showed the complete kit, which could be had for a mere buck-fifty.
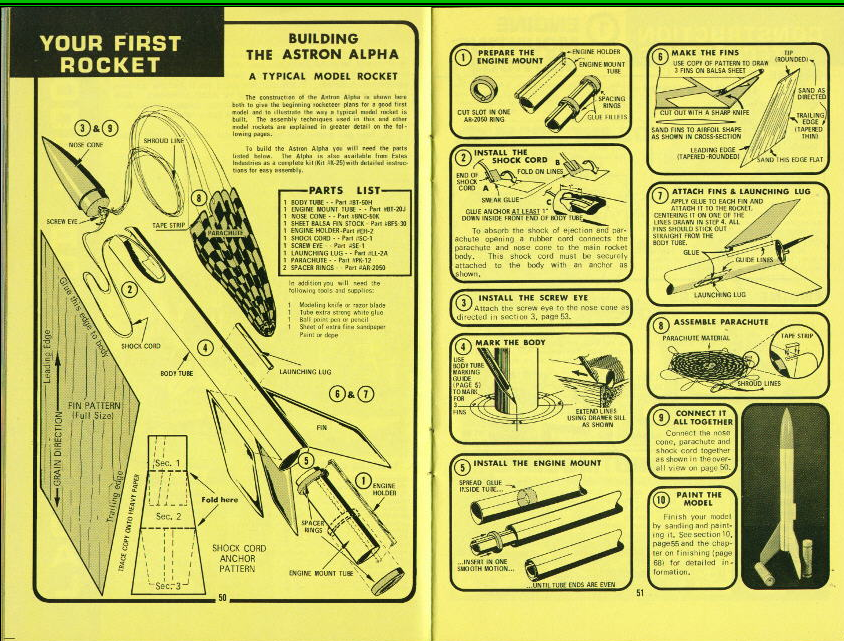


For this BAR-era build of the Alpha, I went with the plans as published in that long-ago catalog.  Except that I used a plastic nose cone which wasn’t introduced in the production kits until much later. 

One other thing I have done differently on this model is the use of 1/16” basswood for the fins rather than balsa.  I plan to log a LOT of flights on this bird, and the stronger fins will hold up much better to all the use and abuse.  Plus, they are so much easier with the grain filling and sealing process.

As with all of my model builds, I also substitute a longer shock cord made from sewing elastic, as opposed to the short rubber cord specified in the plans.

As for the paint pattern, I am really not going with any of the versions illustrated in Estes literature or kit face cards, but I did stay faithful in sticking to that old standard ‘retro’ look. 

The decals are home-prints which include an image of the old ‘Astron’ logo.


I didn't document the build on this bird except for one photo of the model in primer.
 
The Alpha is definitely a nice addition to the growing fleet!

Monday, June 11, 2018

Steampunk Protostar, Part 5 - Fin Prep

It's time to fire up the BlastFromThePast workshop and get started on the Protostar build.
I must first emphasize that I don't usually build a kit in the order laid out in the instructions.
Bad me!
 In my rocket-building world, instructions generally get used only as a general reference for parts placement, specific assembly procedures, and dimensions.
I don't recommend this method for beginning rocketeers, though.
That said, I am starting off with prepping the fins.
After removing the fin sections from the laser-cut sheet, the first step is to sand off the small attachment tabs, and square up the root edges as well as the edges of the two sections that will later be glued together to form the complete fins.
For this step, I use a medium grit sanding block registered vertically against the factory edge of a 1/2" plywood board. This assures that the block will be held perfectly square to the board surface.  A piece of finished plate glass is placed atop the plywood to provide a smooth bearing surface on which to slide the fin sections while holding the edge against the sanding block.


I have a propensity for making jigs and fixtures for building stuff, stemming from my many years doing woodworking.
The accompanying photo doesn't show it, but I'm using a 2x6 LEGO block to hold and press the sanding block against the plywood edge.
Gotta love LEGO!
This method makes for a very efficient way to achieve straight, square edges on the fins.
For cleaning up the curved edges of the fins, and the edge that will be later glued to the fin pods, I use a piece of sandpaper wrapped around a dowel. 
Finally, all of the fin sections get a good surface sanding with some 400 grit.


The pieces are now ready to receive some structural 'Steampunk' embellishments, after which they will be glued together to form the complete fins.

Well, It Sure LOOKS Like A Rocket...!


During our recent trip to InCheon, South Korea, my wife and I visited a place called the International Free Economic Zone (IFEZ).  The IFEZ is a concept city of the future that integrates high-tech. businesses, residential areas, shopping malls, recreation areas, and touring.   
Even more interesting is that the IFEZ is built on former shoreline mudflats that have been built up into solid land – quite a feat of technology in itself!
Upon approaching the main business district of the IFEZ, I saw this interesting-looking structure:


 From a distance, I thought it to be some sort of a missile or rocket on display. 
Turns out it is a fancy support structure holding up the cables for a short suspension bridge spanning one of the numerous IFEZ water-ways.
Here is a portion of the front cover photo of a IFEZ tour brochure showing the true nature of the rocket-like tower:

 
Being a rocket geek, it’s not too much of a stretch for me to imagine building a flying model version of the support device…..


Thursday, June 7, 2018

Steampunk Protostar, Part 4

A couple of weeks ago, I worked up a concept sketch of how I envisioned the Steampunk Protostar would look.  This image was originally posted on one of the forums, so I deem it necessary that it should also be included in this build series.
The drawing does not include all of the details that will eventually make their way onto the model, but it gives a general idea of the overall look.


Wednesday, June 6, 2018

Steampunk Protostar, Part 3

Where else but on the BlastFromThePast blog can one find two simultaneous build threads?
Yep, as the Lunar Patrol project winds down, it's time to get started on that Steampunk version Estes Protostar.
It is my hope that this one will progress a little more quickly than did the LP.
I suppose this first build progress post of the series should feature the obligatory photo of the kit parts laid out all nice and purty on the workbench:


The initial steps of this build will pretty much follow the basic rocket construction as outlined in the kit instruction/instrucciones/anweisungen/istruzioni/navod sheets.
The real meat of this project will lie in the myriad detailing that will be necessary for "punking it up".
As with most scratch-built rocket projects, a lot of this stuff will be done on the fly...tinker-style.
For much of the detailing, I have some ideas about which materials and techniques I will be using, but for some other aspects, I have no idea yet. 
Build by the seat of the pants, I say. 
Hey, it worked with all my competition birds back in the 70s!
That's what will make this project so much fun.
Oops - almost forgot - a scan of one of the kit laser cut balsa fin sheets alongside a ruler:

Just in case I ever need to replace a fin, or scratch build another Protostar, or upscale, or make a "Hippie-VW Microbus-Style Protostar, or a.....
Wait a minnit.... What did I just say?....A hippie VW Microbus-style Protostar?
Now where did I put my sketchpad?.....


Monday, June 4, 2018

All Bushy-Eyed and Bright-Tailed!

Hi, Folks.
By now you might have noticed that I haven't posted here in over two weeks.
Good reason for that.
Simply put, I was away from my PC.
Approximately 6169 miles away, give or take a few.
Mrs. BlastFromThePast and I took a two week vacation to In Cheon, South Korea.  She is from there, so we went to visit her extensive family and do a little sight-seeing.
This morning, I am riding on serious jet-lag and loaded up with caffeine.  As I write, it is 7:45 a.m.  My body/brain clock is still on Korea time which is 15 hours ahead of MST, so I'm thinking it's 10:45 p.m. 
Time for bed.......

Wednesday, May 16, 2018

MPC Lunar Patrol, Part 15 - Booster Decals


The home-print MPC decals are now ready to be applied to the Lunar Patrol Booster rocket.

I am using a brand of clear decal stock for ink jet printers purchased at HobbyTown. 
The decals used for this model are from a scan of an original MPC stock sheet.  A little size tweaking was necessary to get the black and white roll pattern to precisely fit a BT-20 body tube.

Once the sheet was printed, it was shot with two coats of Krylon clear to protect the images.


I found that this particular brand of decal material takes only 10 seconds of soaking before it is ready to move out of the water.  Any longer soak time and the decal tends to curl with a lot of nasty wrinkles that are somewhat difficult to work out when applied to the model's surface.

As has been pointed out on other build blogs, and the forums, working with home print decals takes a great deal more time and patience to get things right. 

Careful attention to placement and working the excess water and bubbles from under each decal with a Q-tip is essential.  The end result is very satisfactory.

This is the front, or 'show' side of the model.


Just for grins, I stuck a decal of my old NAR number on one of the fins.  Even though I am currently not a member, this is a re-build of one of my old-fleet models from a time when I was.

The launch lug side of the Lunar Patrol is more sparsely decorated - a small USA and the MPC logo .


After a day or so of drying time, the decals will be treated with gloss sauce (Future) to seal the edges.

In the meantime, it's off to finish getting some secondary paint colors on the gliders.

Cheers!