Friday, February 25, 2022

Steampunk Protostar, Part 40 - Rivet Strips For The Fins.

 The next operation in the Steampunk Protostar build is a continuation of riveted strip adornment on the leading and trailing edges of the fins.

This requires the formation of twelve more strips cut to conform to the curvature of the fin edges. 

As with the bands made earlier for the main body tube, these strips are 4mm wide with rivet spacing of 3mm. The usual procedure of punching the back of the Avery label sheet with a ball-point pen is employed here.

Again, the strips are painted in metallic silver before being applied to the model:

And, finally, here they are affixed to the Protostar's fins.

These rivet strip certainly provide a very striking contrast to the copper colored rocket surfaces.


Tuesday, February 22, 2022

Steampunk Protostar, Part 39 - More Rivets

 The Steampunk Protostar detailing odyssey continues to rumble on with the making of more riveted components.

The first of these are made to adorn the main body tube with 'metal' strips placed at each of the joints formed by the riveted 'copper' skin panels.

Again, the strips will be made from adhesive Avery label paper. The strips are marked out to a 4mm width.

Like the tail section rivet strips made earlier in the build, these 'rivets' are also punched from the back side  of the paper using a ball-point pen tip. Rivet spacing is 3mm.  It should be noted that the strips are not cut from the sheet until after the rivets are punched'


Once the strips are completed, they are taped to a cardboard paper towel core for painting.  Painting them separately will be much easier than applying them to the model first, then masking.  Also the thin edges of the paper strips will receive paint so that they look more like metal bands.  Metallic silver spray paint is used to finish the strips.


Once the paint is dry, the strips are carefully applied to the model using a paper wrap guide to align them correctly.  The ends of the strips are aligned with the launch lugs so as to hide the seams on the 'back of the model. The edges of each strip are pressed down using a Q -tip.

Finely, a drop of thin CA is applied to the seams to keep the ends from pulling up.

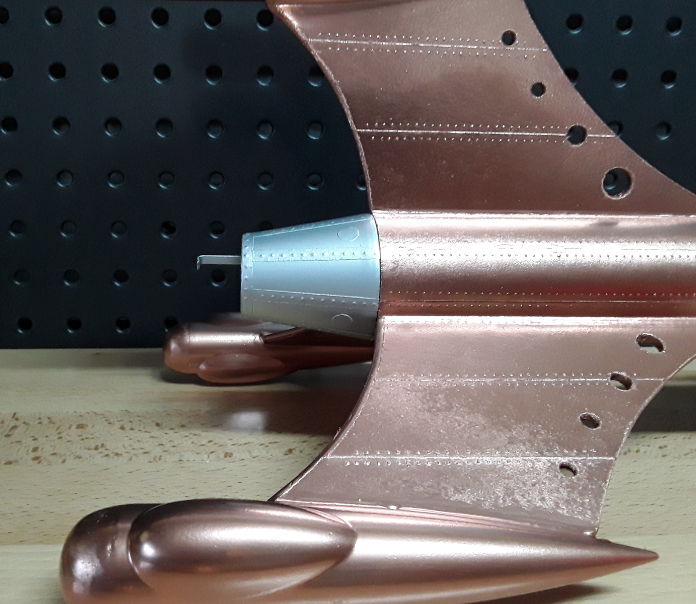
Here is the finished result:

Next post:  still more rivet strips.


Friday, February 18, 2022

Steampunk Protostar, Part 38 - Details, Details,,,

 The Protostar build is sailing along nicely. All of the remaining operations involve the application of more detailing elements that will continue to make the project Steam...punkier.

The first step, of course, is to attach the small assemblies made earlier in the build - the launch lugs, air intake, and smoke 'stack'.   These parts are epoxied in the appropriate spaces of the main body tube that were masked off before painting.

I did remember to use a small sanding tool to remove the shiny mylar layer from the tube to better facilitate glue adhesion.

Moving on...


Tuesday, February 15, 2022

Steampunk ProtoStar, Part 37 - Painting Day!

 The assembled and detailed parts of the build are now ready for application of color coats.

The tail assembly is shot with silver paint, with the main rocket getting the good old Steampunk treatment -copper!

I was very pleased at the results.  The metallic paints seem to really make all of the fine rivet details stand out very nicely.


Once the paint was completely dry, I was able to epoxy the motor mount/tail piece in place.


The model is actually starting to look like a rocket, now.

More to come.....


Friday, February 11, 2022

Steampunk Protostar, Part 36 - Preparing To Paint

 The Protostar is now fully ready for the base color paint coats.   Obviously, since there is so much fine detail on the model, I am bypassing any primer steps and going straight to the finish coats.   A little prep work is required before this happens:

First, some CWF is applied to some of the rivet panel seams.  Some of them have gaps between the panels that might hinder the placement of some more future detail elements.  Once the CWF is dry, it gets sanded level.  This has to be done very carefully with a thin sanding stick so as not to disturb any of the rivets.

Finally, the locations where the launch lugs and other details will be glued on get masked to keep paint off of those areas.  

Now, I just need to wait for a suitable day to paint outdoors...

Tuesday, February 8, 2022

Steampunk ProtoStar, Part 35 - Detailing the Tail-Piece

 In this step of the build, the plastic tail-piece will get detail embellishments.  These are in the form of 'riveted' seam strips.

The strips are rendered in pretty much the same manner as the riveted panels on the main body tube - adhesive backed label paper punched with rivet detail, then applied into position on the tail shroud. The primary difference here is the size of the rivets.  These thin sections are punched with the tip of a ball point pen to make larger rivet heads.

The first strip goes around the very end of the tail. Standard paper shroud layout techniques were used here to obtain the proper curvature.

All of the paper strips used in this detailing step are cut to a width of four millimeters.  Rivets are spaced roughly 3mm apart, centered on the strips.

Marks are made at the wide end of the shroud to mark placement of  vertical rivet strips.  Note that the first strip will cover the plastic seam of the tail shroud.  This is one of seven that are required. 

Here is a photo of the rivet punching technique:

This is a photo of one of the completed strips:

Now, all of the vertical rivet strips are cut, punched and attached to the shroud. Note the circular details attached between some of the rivet strips.  These are sort of an afterthought, easily made by using a standard paper punch on the label sheet.


The completed tail assembly is now ready for shoulder masking and painting.


Friday, February 4, 2022

Steampunk Protostar, Part 34 - Attaching The Fin Pods

The next step of the Protostar actually refers back to use of the kit instructions.

What?     Instructions?    NO WAY !!

This portion of the build calls for attaching the pod assemblies to the fins.  Per directions, the pods are marked at 1-1/4" from the rear of the plastic pod piece.  These marks are to be aligned with the trailing edge of the fins.

I found this step to be the trickiest part of the build so far.  The pods are initially attached using CA glue.  It took some very creative use of  tape hold downs and careful balancing of the model to keep each pod in position and properly aligned until the glue could set. Only one pod could be done at a time.  

After the CA set, a small batch of epoxy was mixed and fin/pod fillets applied.   I learned the hard way to do each pod separately in this manner.  Before that, I was attempting to CA tack on all pods one after the next.  I ended up somehow bumping the previously attached pods and knocking them off!. It was like circus plate spinning!

Anyway, I finally managed to get all the pods glued on and securely filleted.

Here is the Protostar finally standing on its own supported by the pods...


Tuesday, February 1, 2022

Steampunk Protostar, Part 33 - Rivet Panels Finished

Hooray! The Steampunk protostar build series has finally returned.  Many of these posts have been completed for a long time, but have sat idle in 'draft' status up until now.

Today I have begun finishing up the final detail steps on the model, so things should all meet up within the next few weeks.


 The most time consuming part of this build is finally complete.  A total of 32 individual adhesive backed label stock panels, all with rows of hand-punched 'rivets', make up the ship's main body surface.  

Rivet spacing is 1/10" apart, and there are 16 rows of them running the full length of the model's 16" body tube.

I haven't counted them, but that's a ton of rivets!

The photo shows that there are some gaps between the ends of some of the applied panels.

These will be covered up by some wider riveted bands around the tube at each panel section that will be applied in a future step.