Saturday, April 29, 2017

A Cheap and Simple Boost/Glider Launch System


My return to the hobby of space modeling as a 'Born Again Rocketeer' has abruptly whisked me off into the realm of front engine boost and rocket gliders.  I knew it would only be a matter of time before I was once again diving into what was undoubtedly my most favorite facet of model rocketry in the earlier days.

That being the case, it is now imperative that I build an appropriate ground support system to accommodate these interesting models.  And, having allotted myself a limited amount of monetary resources for model rocketry, this system must be built on the cheap!

There are two major criteria for building a good launch system for front engine gliders:

Launch rod length, and preventing clip lead hang-ups.

The Launch Rod

Many rocketeers (myself included) have made the mistake of using a standard 36-inch launch rod to provide initial guidance for their front engine B/Gs.  The problem here is that the length of the glider requires that the engine pod be placed higher on the rod.  This results in only 18-24 inches of effective rod length remaining to guide the model. Usually, a glider model hasn’t reached sufficient airspeed over this short distance to continue in a vertical ballistic trajectory.  In most cases, the model will leave the rod and ‘tip off’ in any direction, resulting in a near horizontal or spiraling flight path, sacrificing altitude.  In the worst case, the model is quite prone to attempting to enter a region of extremely high drag (the ground) under power.

“No good!”  says BlastFromThePast.

There are two effective methods for achieving proper launch rod length for B/Gs and R/Gs.  The first is to simply build an extension of the launcher, such as a wood dowel or a metal bar where the launch rod can be inserted into the end.

The other method is to simply get a longer launch rod.

That is my choice for the new launcher, so a trip to the BORG (that’s Big Orange Retail Giant a.k.a. Home Depot) to pick up a 1/8” x 48” rod, was in order. I was quite surprised to find that it took a little bit of searching through the available stock to find a perfectly straight rod. 

Chinesium.  Harumph!

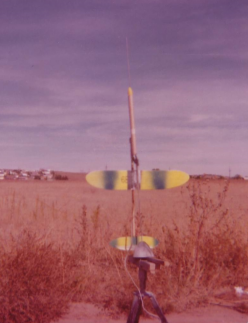
Now, with a standoff, I can place most any B/G model on the rod and have enough length to properly guide the model.

But, what about the second point?

The Clip Leads

Merely hanging some unsupported clip leads from the engine pod introduces the risk of having them fall and hang up on the glider at ignition.

The solution – build a gantry to hold the leads and allow them to swing AWAY from the glider after having performed their assigned task.

My version of this device is engineered quite simply, using a couple scraps of wood and a small assortment of hardware.

First, a base is cut from a small 1x3 block of hard maple.  A 1/8” diameter hole is drilled in the center to allow the base to fit snugly over the launch rod.

Normally, I would perform this function the ‘Neanderthal’ way, using an old timey ‘eggbeater’ hand drill.  But, since I need this hole to be exactly perpendicular to the rod, I had to fire up the drill press for better accuracy.

Next, a 12” stick of ½” square pine is scrounged out of the wood scrap box.  This will make a dandy gantry.

To mount the gantry to the base, I will be using a common small angle bracket.  Since I want the gantry to lean slightly away from the launch rod, the bracket gets squished between some vise jaws to bend it at to approximately 110 degrees.


To hold the clip leads, a hook is made from a short length of clothes hanger wire.  This will be inserted into a hole at the top of the gantry. 

I told you this project would be cheap and simple…


Before final assembly., the wood pieces are sanded smooth and painted to look more ‘purty’.

All the parts are now attached using small flat head screws.


The clip hook is inserted into a hole drilled at the top end of the gantry...


Voila! A cheap, yet efficient launcher accessory.


Nothing fancy. Nothing schmancy.  Cost me all of a few cents and an hour to build.

Now it’s off to fly me some Boost/Gilders!


Thursday, April 27, 2017

Back In The Day, Part 4 - A Heart-Stopping Astrocam 110 Flight!

Now that I have recently completed restoration of the vintage Delta II carrier vehicle to operational condition, I must regale all of you blog-readers with the exciting tale of a flight turned in by this model back on April 25th, 1981.
The location for this launch was the Rustic Hills North shopping center in Colorado Springs, located at the north-east corner of the intersection of Academy and Palmer Park Boulevards.
The event was a Spring demonstration launch put on by the Skywatchers / ROMAR rocket club.
This annual affair was sponsored by the Ru-Jan Party and Hobby Shop, which was located in the strip mall on the north side of the parking lot.
I had brought along my Delta II / Astrocam tandem to fly at this event in the hopes of getting a good aerial photo of the demo site.

I should have known better, but I decided to fly the bird on a B14-5 engine (some of you old BARs might remember these).
After a little bit of Public Address fanfare, asking the spectators to "smile for the camera!", the model was launched.
The Delta II boosted straight up to a respectable altitude, arched over, and began a screaming ballistic descent toward the parking lot!
It was then that I realized that a 5 second delay is pretty darn long.
I watched as the model streaked closer and closer to what I was sure would be its spectacular demise...
Then...POP...off went the ejection charge...maybe a mere fifty feet above the asphalt!
The parachute deployed immediately, and lowered the model for a gentle landing.  It's a good thing the 'chute was equipped with over-the-canopy shroud lines or it could have easily been shredded by the heavy model traveling at a high velocity.


Here is the photograph snapped by the Astrocam...


This is a good shot of what might have become the camera's final 'parking spot' !!

To this day, I still have not been able to identify the mysterious object resting in one of the adjacent  spots.
Cheers!


Tuesday, April 25, 2017

The Old Delta II Rides Again!


This model is one of the two ‘old fleet’ rockets that were retained when the collection was sold in 1985.

Like the old fleet Hornet, the Delta II / Astrocam110 spent 30+ years stored in a RubberMaid tote along with other model rocket items.

In early 2016, when my BAR activities began, the Delta/Astrocam110 tandem was pulled from storage and put on a display stand in the workshop.


It wasn’t long before I made the determination that the model would be restored to flying condition and launched again in the BAR era.  The Astrocam110 payload will not be flown, because of the inherent risk of losing or damaging what I consider to be a collector’s item. 
I had entertained the thought of trying to get ahold of some 110 film cartridges and fly the Astrocam110 as intended.  After researching, I found that such film is prohibitively expensive (at least on my hobby budget).  Also, finding a place that will process the film might be difficult and costly. Better to leave well-enough alone.

Instead, a new payload section has been built to fly atop the Delta II booster.  This consists of a length of BT-50, a PNC-50 nose cone, and a lathe-turned balsa transition section.


A new balsa transition section fresh off the lathe.


Curiously, when the Delta II/Astrocam was first pulled from the storage box, I popped the camera payload off and was met with the strong odor of burnt black powder, as if the model had been launched only yesterday!


“No way”, I exclaimed, “This thing’s been in storage since 1985!”


I soon found out why…

The original Delta II / Astrocam 110 model.


Apparently, back in the day, I had prepped the model for another flight, which never took place. 


Inside the body tube were still packed the recovery wadding, folded parachute, and shock cord. 

The wadding had essentially sealed the tube, and the BP smell from the model’s last flight (April 25th, 1981, according to the flight logs) was still present after all these years.   


Go figure!


Now, fully equipped with a new payload section and shock cord, the Delta II is quite ready to log many additional flight missions.

Possible future plans for the model may call for constructing yet another payload section designed to carry one of those small spy video cameras. 
For now, however, I will enjoy flying old number 79 as a sport bird.
Here are a couple more pix of the payload section under construction.....


Some Nifty Rocket Display Stands


In fulfilling my promise to Mrs. BlastFromThePast concerning keeping my model rocketry activities nice and pretty, I have been setting about fashioning some attractive display stands for the model collection.

Since I also enjoy the pleasures of hand tool woodworking, the new stands are built completely with vintage tools.

Cut is made using a backsaw and a bench hook.
First, a piece of 1x4 pine is marked off for a cut.


Clean up the cut edges with a file…

Mark the center with an awl for boring a hole for a support dowel…

An "Old Timey" brace and auger bit to bore the hole. 
In this case a number 6 auger is being used to make the hole for a 3/8” dowel.  
Vintage augers bits are stamped with a number that represents how many 16ths of an inch of diameter they are.


One edge beveled at approx. 45 degrees using a smoothing plane…

The Completed base.


Cutting the dowel to length with a razor saw….


Dowel glued into place….
A spent 13mm model rocket engine
casing is glued to the end of the dowel….


Application of little matte
black acrylic paint…
And finally, a few squares of felt glued to the bottom of the base…

Another in a fine and dandy set of model rocket display stands!


Saturday, April 22, 2017

Back In The Day, Part 3 - A Man of Many Boost Gliders


In looking through the scrap book of photos and flight log records spanning my early years in the wonderful hobby of model rocketry, I found that a good number of my model fleet consisted of boost gliders or models with a gliding component. A full 25% of them, in fact!

The majority of these gliding birds were built for NAR competition events. Many were of my own design.   I experimented with nearly all aspects of boost glider technology prevalent in the day – standard front engine pop pods, variable geometry rocket/gliders, parasite gliders, ejectable flex wings, you name it.  There were even a couple of commercial sport glider models thrown into the mix:  an Orbital Transport, a Scissorwing Transport, and an MPC Lunar Patrol.   The only variety of boost/glider I didn’t build was a rear engine Space-Plane-type model. That design was pretty much passe by the time I started diving into serious B/G competition.
This collection of gliders ran the gamut of various degrees of success.  Some crashed and burned on their first flight, while others performed wonderfully.  Some glided like streamlined bricks, while others fluttered like feathers. A couple were lost to engine CATOs right on the launch pad.  There were a few ‘Red Barons’.  The best ones were lost when they were ‘thermaled’ away into the wild blue beyonder, never to be seen again.  A few even won some meet ribbons and garnered NAR contest points.
For me, this whole collection of balsa, spruce, plywood, and sheet plastic represented one of the most gratifying facets of model rocketry.  There is nothing quite like the sight of a well-built glider model climbing straight up, separating, and wheeling in lazy circles.

Today, as a Born Again Rocketeer, I have so far limited my new model rocket fleet to small, 13mm-powered standard birds, but I have been certainly eyeballing a lot of boost/glider models, designs both past and present.  Since my first BAR boost/glider just recently came off the work bench,  I thought I would post a montage of some of my ‘old fleet’ B/Gs and R/Gs.  Most likely, some of my future rocket projects will be re-makes of some of these old glider faves from years ago (1975-1984).
Oh, and I think it’s high time that I get around to building that Space Plane, too…..


Thursday, April 20, 2017

BAR Rocket Fleet #109 Mini-Maggot 3


An Old Favorite


The original Mini-Maggot in 1975
The Mini Maggot 3 is a BAR era re-build of a pair of custom designed boost gliders built in

1975-1977 for competition in the ¼ A and ½ A engine classes.  

The original old-fleet Mini-Maggot proved to be a good performing model, turning in several flights.  The model’s best performance occurred on 20 February, 1977.  Boosted by a 1/4A engine, the glider transitioned well and promptly flew into a thermal.  It posted a very respectable time of 64 seconds.

The model was later sold along with most of the model collection in 1985 as part of my exit from model rocketry.


 Another version of the Mini Maggot was built in 1977, which utilized styrofoam wings.  Flown in parasite configuration on a standard booster rocket, the glider did not survive its maiden flight.

The Mini-Maggot 2 in 1977.  Flown as a parasite on a
standard rocket, the tandem pranged. 
That's me n' my old 1957 Dodge Coronet in the
background in the photo at left.


The Mini-Maggot 3 is built nearly identically to its 42-year predecessor.  Dimensions were taken from the above photograph of the original model.


The glider’s wings and tail section are made from 1/16 C-grain balsa, and the fuselage is basswood.  The pod hook enclosure is made from 1/32 thick plywood.

Finish on the glider consists of one coat of white Dupli-Color primer, well sanded.  The color coats and markings are rendered with Sharpie markers.  


The pop-pod is of standard BT-5 construction finished with primer, Testor’s International Orange enamel, and ‘gloss sauce’.

This model is probably the closest to any kind of a contest-grade model rocket anticipated to be built during the BAR era. 


Friday, April 7, 2017

MPC Lunar Patrol, Part 5

Today's post covers some progress on three different sections of the model.

1. Gliders - The wing elevators have now been attached to give the gliders a little negative incidence.  As soon as the joints are cleaned up and smoothed out, the wings will get a final overall finish sanding.

2.  A small balsa standoff is glued to the body aft of one of the fin assemblies and a seam-filled launch lug is glued into position.  Looks like the fin received a couple of small 'construction dings' just to the left of the launch lug.  Must break out the CWF.


3. A balsa block is cut to rough size and mounted on the wood lathe's faceplate in preparation for turning out the glider nose cones.  Even though the stock is trickier to mount, I prefer face turning  over spindle turning on nose cones because they can be finished right to the tips. 
Here, a piece of scrap 1x4 pine is centered and screwed to the faceplate, and the balsa stock is center glued to this piece.  The plan is to turn each nose cone one at a time out of the same piece of stock.


The stock is now mounted on the lathe, ready to go.  There's an old woodturner's / woodcarver's adage that applies here: 
"Turning / carving a [nose cone] is quite simple.  You just grab a chunk o' wood and remove all the parts that don't look like a [nose cone]."


Were it that easy....

By the way, while I'm here, I just have to show off the fancy-shmancy stand I built for my lathe a couple of years ago.  This bit of shop furniture was constructed completely using vintage hand tools, i.e., hand saws, hand planes, brace & bit, and files.  Not a single operation done with sacrificial electrons.


Let me tell you, hand-shaping dimensional 2x lumber is quite the physical workout!  That's why I call them 'Armstrong' tools....