Thursday, August 24, 2017

MPC Lunar Patrol, Part 8 - Glider Pylons


After a long hiatus, I’m finally back on track to realize completion of the Lunar Patrol.

The pylon/standoff pieces and dowel pins that attach the gliders to the booster pods are the next items on the list to be built.

                The original MPC kit called for the pylons to be made of a piece of balsa wood cut to the shape of the template supplied with the kit.  This piece is way too fragile and prone to breakage on each and every flight.  I experienced this issue with my old fleet Lunar Patrol, and had to engineer an alternate way to strengthen them. 

The pylons in this re-build will be made from 1/8” thick basswood with the grain running perpendicular to the nose cones for added strength.

Since I do not wish to purchase a whole sheet of 1/8” basswood to make these small parts, I’m going with laminated pieces, from a 1/16” sheet which I already have on hand.

The pylon template from the kit instructions is a bit oversized for this build because of the slight difference in tube and nose cone diameter between the original MPC tubes and the Estes BT-20 being used. 

In addition, I am reasonably sure that my custom turned nose cones are of a slightly different shape and length compared to the kit originals.  I essentially guessed at them based on kit photos and instruction sheet illustrations.  The template gets tossed aside….

Instead, the pylons will be re-designed and shaped to fit the current nose cones.

To start off, I marked out a sketch of the basic nose cone profile on the piece of stock to establish baseline dimensions.  This was done by carefully sighting down straight over the nose cone, and keeping the pen perfectly vertical.
 
Two rectangular pieces are cut out to the required nominal length and width of the pylons.

The pieces are laminate glued together with the profile-marked piece on top.   What's up with the ragged marking line?  This was a dufus mistake...I grabbed a fine tip sharpie to go over the line so I could see it better.  The ink immediately ran into all of the wood grain.  Oh, well, I have to roll with this.

Now it’s just a matter of carefully sanding the nose cone profile into the pylon piece. This is done with a sheet of 220 sandpaper wrapped around a dowel.  I must be very careful here so I don’t break the piece because of the grain direction.  Mounting the part in a vice will help greatly with this process.

 
One additional note:  I used a razor saw to cut off a lot of the excess wood inside the profile before starting the sanding operation. No sense in doing a lot of un-necessary work! 
 
Once the piece is sanded down close to final shape, I switch to finer sandpaper (440) to finish the exact profile.  Checking often with the nose cone helps here.

 Since there are likely slight differences between the two turned nose cones, the second pylon must be made and fitted in the same way.

Stay tuned for Part 9...

Tuesday, August 22, 2017

Solar Eclipse Day in Colorado

I am lucky enough to be working for a company that is 100% full of science geeks, so Monday's eclipse was a very special time around the building.  Here in Colorado, we hit 92% coverage, so it was still fun to watch.
One of my co-workers set up a pair of binoculars on a tripod to project good magnified images on a back board. I didn't need to look through any fancy specs directly at the event. Instead, I had more fun taking cel phone pictures of the projections at 15 to 20 minute intervals during the entire eclipse.

This is a picture of the observing set-up used.  Makeshift, but very effective...


Ten minutes into the event....

The rock holding the back board in place is a good representation of the rogue planet NIBIRU, which is supposed to destroy the earth soon!


This pic was taken at maximum coverage in this area, approx. 11:47 a.m. MST

A cool picture showing hundreds of mini projections in the shadow of a nearby tree. This was taken slightly after maximum coverage.


I don't expect that many people took too many images of the moon's limb exiting the sun's.  I'm a professed nerd, so here it is...


The really cool thing is these maginified projections show sunspots!  A large grouping appears in lower center of the sun's disc, and a smaller group appears just next to the tiny remnant of the moon's image in this photo.  Also if you enlarge this photo, you can actually see hints of the 'grainy' appearance of the sun's surface, as well as the characteristic curvature shading around the disc edges.

Yep, I may have missed out on the spectacular views of totality enjoyed by the many who traveled to be in  'The Path', but I had a very enjoyable day at work viewing 'Eclipse 2017' with all of my geek friends and co-workers!

Astronomy is nearly as fun as model rocketry!


Sunday, August 20, 2017

Nice Hobby Lobby Haul


Last week I stopped by the local Hobby Lobby, clutching a 40% of coupon in hand, to purchase an Estes Mercury Redstone kit.

To my delight, I also found a couple of other kits marked at 40% clearance - a Nike Smoke and Super Neon.  I just couldn't resist.

These new additions to my build list will keep me busy well into the winter months, at the snail's pace in which I get rocket projects completed!

-Ed


Wednesday, July 19, 2017

MPC Lunar Patrol, Part 7 - A Minor Setback

It has been quite some time since I have had a chance to resume work on the Lunar Patrol.  Lot of life stuff happening since the beginning of the year.
So, last night I grabbed the booster rocket off the bench and headed for the 'BlastFromThePast Vehicle Finishing Facility'  (a large cardboard box in the corner of the back yard), to apply the first coat of primer.
When I tried to insert the engine casing on the end of the painting wand into the main tube, I found it to be exceedingly difficult.
Here's why:

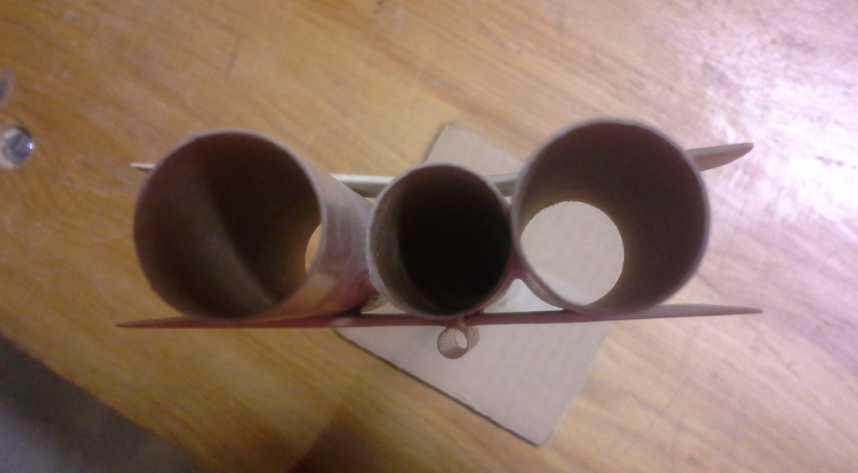
In this photo, it can readily be seen that the main tube is a distinct oval shape, and one of the fin units is somewhat warped.
How did this happen?
Here's the answer:
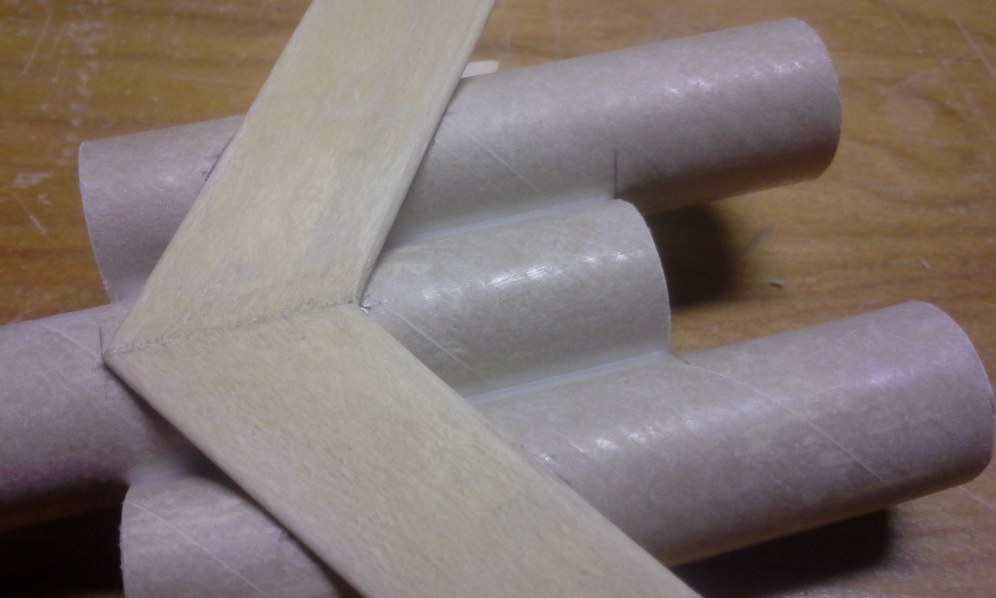
After assembling the three tubes, I had applied a very liberal set of fillets using Elmer's white glue to hide the big gaps and bubbles that invariably plague parallel-glued tubing.


This attempt to make things pretty led directly to the dreaded 'Elmer's Effect' - severe glue shrinkage that warped the body tubes completely out of round.  Things are so bad that one of the gliders will no longer fit between the fin projections.  To make it fit in the present condition would require inner surface of the fins to be sanded down to 1/32" thickness.
No good.
I have a couple of options here.  The first is to use the 'Forced Air Thermal Alignment Apparatus'   (my wife's hair drier). 
The idea is to insert engine casings into all three tubes for support, then heat up the joints with the hair drier to soften the glue and allow re-alignment.  It is hoped that, when things cool down, the components will retain the proper position.
If this doesn't work, I am afraid the only other course is to scrap this booster, buy another BT-20 tube, and start it all over.
Sigh.
Live and learn.
In the meantime, the filling and sanding of all those balsa glider parts is still progressing.


Wednesday, July 12, 2017

Back In The Day, Part 6 - "When I Grow Up, I Want To Be...A STARLORD !!"

This was never a childhood dream of mine,  but that very thing happened in 1976 when I was contacted by a Mr. Dennis Bishop to join the Starlords International Association of Rocketry.
Mr. Bishop ran this club out of Hawaii, and, at its height, it boasted many members across the U.S. and all over the world.  The group operated under their own sporting code - the 'Gold Book', independent of that used by the NAR.
After joining, I happened to mention to Mr. Bishop that I had mechanical drafting experience.  I was readily appointed as the 'plans editor' for the Starlords new letter, The Stellar Winds.  I soon received from Mr. Bishop a large envelope full of rocket plans submitted by various Starlords members for publication.  It was my job to make pretty drawings of them to send back and be printed in the news letter.
Perhaps the best part of being a Starlord was in the opportunity to correspond with model rocketeers from around the globe.  One of the best acquaintances I made through the group was with Mr. Herb Desind - 'Mr. Cineroc' himself! The ensuing friendship will be the subject of a future blog post.
This is a 'fuzzy' picture of my old Estes Spaceman model rocket, painted in the likeness of the Starlord mascot.  The inscription around the model's base reads 'Starlords International Association of Rocketry'.


And a real, honest-to-goodness Starlords membership ID card!


Fun times!

Wednesday, July 5, 2017

Launch Date: 4 July, 2017


A few weeks ago, I made a happy discovery in the town of Castle Rock, Colorado, where I live:  There is a moderate sized grassy field about half mile from my home which is perfectly suitable for LPR flying up to B engine range.  This area is the football practice field adjacent to Douglas County High School.  I walked it and found it to be roughly 700’ by 1000’ total.  The area includes a soccer field and baseball field on the east end.  The school buildings occupy the west end, and residential areas border the north and south sides.   Another nice feature is in the form of a couple sets of bleachers located atop a grassy slope about mid-field.  These are each on a cement pad, so it is a perfect place to set up and launch. The bleachers make for a handy ‘prep’ bench, and there is plenty of room on the cement pad for launchers.   A couple of small trees are close by to provide shade on a hot day.  I hadn’t discovered this location until recently because it is not easily visible from any adjacent streets.
Having had some free time on Independence Day morning, I took advantage of the prevailing calm weather conditions to go out and give this field a try.  My wife and I arrived around 8:30 a.m.  This was the first rocket launch to which she has accompanied me in my BAR activities.  I believe the last time she watched me launch rockets was back in August, 1983 at the HOTROC-4 Regional contest in Colorado Springs!
Anyway, I quickly got things set up at what I will now call DCHS Proving Ground.  The first bird off the pad was the Estes Mini-Brute Hornet on an A3-4T engine.


Perfect straight up boost, chute deployment, and recovery!  The model drifted down and landed within forty feet of the launch pad.  The flight was a perfect christening of the new launch field.
Mrs. BlastFromThePast was duly impressed, as well!
 
Next up was the Mini Maggot 3 boost/glider, which had turned in a less-than-perfect maiden flight about a month ago.
This time I used a 1/2A3-2T engine, hoping for better results.


A strange thing happened at the launch of this bird.  With my finger hovering over the controller button, I was fumbling with my cel phone to get my usual launch video started.  I began the countdown, and just as I said “5….” My finger twitched and the model launched!  I missed seeing the boost!  Luckily my wife was there and tracked the flight to apogee.
“I don’t see it!” I exclaimed.  She pointed me in the right direction, and there it was…the Mini Maggot glider wheeling gracefully in a somewhat tight right-hand circle.  It had worked!  Perfect pod separation.  No Red Baron!  “WooHooo!!!"
I followed the glider during its descent.  By the time of this launch, the wind had picked up to around 5 mph in the direction of the short side of the field.  The glider was heading dangerously close to the residential area to the south.  I saw it touch down just this side of the fence. 
I didn’t time this flight, but I estimated the duration to have been well over a minute.  Luckily there was no thermal activity to speak of or I would have been kissing this one goodbye.
It still took about a 10 minute search before I found the glider in some tall grass just outside the park perimeter.  Both it and the pop-pod were recovered with no damage whatsoever.  I was elated at my first successful boost/glider launch in the new BAR era.
The only negative aspect of the flight was the discovery that the engine casing had ejected from the pod.  Had this been a competition flight, it would have been a DQ.  But since this was a sport flight:  Meh!
I had intended to fly the Delta-II as well, but since the wind was starting to become increasingly present, I opted out and packed up the gear, satisfied with two excellent flight missions.
My wife and I headed home to enjoy the remainder of the Independence Day festivities…..

Monday, June 19, 2017

An Interesting Find….


This weekend I was going through some boxes of old files and papers, and found this…
 
 
A pristine Estes 1973 Catalog!
1973 was, of course, the year that I got started in model rocketry.  I must have obtained two copies of this catalog at the time, because I recall that I had a ‘working copy’ that was all dog-eared from use and filled with marks and notations.
This was the ‘good’ copy that was stashed away, thus missing being included in my big model rocketry sale of 1985.
This one is definitely going into an archival storage bag and saved in its present condition.
Cheers!