One of my early childhood memories is that of a Nike Hercules missile that was on display in downtown Colorado Springs where I grew up.. I remember always being thrilled whenever I was in the car with my folks and we happened to drive by that missile.
Of course, being around 3-5 years old, I knew nothing of military missiles.
In my eyes, this thing was an honest-to goodness SPACESHIP!
I was quite convinced that the little access hatch on the side of the rocket was a door for miniature spacemen!
I was also completely unaware that, at the time, a group of people in nearby Denver, and even in my home town of Colorado Springs were quite busy laying the groundwork for a model hobby involving missiles, rockets, and spaceships.
Not to mention that a mere dozen or so years later, I would be deeply immersed in that hobby myself!
Or that another 40 or so years hence, I would still be deeply immersed in that hobby.
So, just the other day, I was thinking about that Nike Hercules missile which sparked my imagination so many years ago. I knew that the vehicle had disappeared from display sometime in the late 1960's, and I wondered whatever became of it.
A quick search on the Wonderful World Wide Web revealed that there is a Nike Hercules currently on display at the Peterson AFB Air and Space Museum in Colorado Springs. I wondered if this could be the same missile.
I found a website for the Museum, and shot them a quick e-mail inquiring if this was the same vehicle.
I got the response this morning....
"Mr. Mitton,
You are correct, our display Nike Hercules was presented to El Paso County in July 1959 by the US Army Air Defense Command, headquartered at Ent Air Force Base, and on display in front of the El Paso County Courthouse (now the Colorado Springs Pioneer Museum) for a number of years. It came into our possession in the late 1970's when the North American Air Defense Command established a Visitor Center on then-Peterson Field in 1976. The NORAD Visitor Center was replaced with the Peterson Air and Space Museum when the museum was established in 1981.
I've attached a photo of the bronze plaque that was part of the Nike missile display when it was located downtown."
Cool!
Here is a picture of the plaque...
and of the Nike Hercules itself on display at the museum...
Cheers!
Thursday, September 14, 2017
Wednesday, September 6, 2017
MPC Lunar Patrol, Part 9, Booster Assembled
It's back to the workbench to plug away at the Lunar Patrol Build.
For starters, I procured Mrs. BlastFromThePast's hair drier to attempt a fix for the body tube warping mentioned a few posts back.
Placing expended engine casings in all of the effected tubing for support, the assembly was hit with hot air to soften the glue.
It worked.
Now the model is the correct shape. An engine fits nicely in the center tube, and the gliders fit much better between the fins.
The last items to attach now are the two half-inch sections of launch lug inside the glider support tubes.
These function to center the gliders and provided extra support to the edge of the tubes.
Construction is now complete on the booster rocket.
Next step is shooting primer and performing additional surface prep for painting.
For starters, I procured Mrs. BlastFromThePast's hair drier to attempt a fix for the body tube warping mentioned a few posts back.
Placing expended engine casings in all of the effected tubing for support, the assembly was hit with hot air to soften the glue.
It worked.
Now the model is the correct shape. An engine fits nicely in the center tube, and the gliders fit much better between the fins.
The last items to attach now are the two half-inch sections of launch lug inside the glider support tubes.
These function to center the gliders and provided extra support to the edge of the tubes.
Construction is now complete on the booster rocket.
Monday, September 4, 2017
A Nifty-Keen Rocket Building Bench Accessory
Happy Labor Day!
This morning I got up and headed down to the shop to knock together a project for the work bench.
I have this unused Flat Screen TV stand banging around in the basement, and recognized it as a perfect benchtop stand for doing close-up detail work on model rocket components.
Pulling out my vintage hand tools, I set to work....
First, an appropriate sized piece of 1/2" birch plywood was cut out to make the work surface.
A little work with a hand plane and file to clean up the cut edges.
Once the piece is marked for centering on the mounting plate, I had to mark out and drill a few recess holes to accommodate some mounting screws and metal guide pins.
Now the plywood work surface gets attached with a few flathead wood screws.
Almost done.
As a finishing touch, a wooden stop bar will be added to the lower edge of the work surface to keep things from rolling and sliding off. A paint stir stick from the BORG will serve nicely for this. This particular stick has the added feature of an inch scale printed on it.
Cut to length...
Drill, countersink, and mount with some more flathead screws...
And, voila!..a very useful assembly accessory.
Coupled with a mag. light, it is just the ticket for doing some of that close up detail work.
Cheers!
Thursday, August 24, 2017
MPC Lunar Patrol, Part 8 - Glider Pylons
After a long hiatus, I’m finally back on track to realize
completion of the Lunar Patrol.
The pylon/standoff pieces and dowel pins that attach the
gliders to the booster pods are the next items on the list to be built.
The
original MPC kit called for the pylons to be made of a piece of balsa wood cut
to the shape of the template supplied with the kit. This piece is way too fragile and prone to
breakage on each and every flight. I
experienced this issue with my old fleet Lunar Patrol, and had to engineer an
alternate way to strengthen them.
The pylons in this re-build will be made from 1/8” thick
basswood with the grain running perpendicular to the nose cones for added
strength.
Since I do not wish to purchase a whole sheet of 1/8”
basswood to make these small parts, I’m going with laminated pieces, from a 1/16”
sheet which I already have on hand.
The pylon template from the kit instructions is a bit oversized for
this build because of the slight difference in tube and nose cone diameter
between the original MPC tubes and the Estes BT-20 being used.
In addition, I am reasonably sure that my custom turned
nose cones are of a slightly different shape and length compared to the kit
originals. I essentially guessed at them
based on kit photos and instruction sheet illustrations. The template gets tossed aside….
Instead, the pylons will be re-designed and shaped to fit
the current nose cones.
To start off, I marked out a sketch of the basic nose
cone profile on the piece of stock to establish baseline dimensions. This was done by carefully sighting down
straight over the nose cone, and keeping the pen perfectly vertical.
The pieces are laminate glued together with the
profile-marked piece on top. What's up with the ragged marking line? This was a dufus mistake...I grabbed a fine tip sharpie to go over the line so I could see it better. The ink immediately ran into all of the wood grain. Oh, well, I have to roll with this.
Now it’s just a matter of carefully sanding the nose cone
profile into the pylon piece. This is done with a sheet of 220 sandpaper
wrapped around a dowel. I must be very
careful here so I don’t break the piece because of the grain direction. Mounting the part in a vice will help greatly
with this process.
One additional note: I used a razor saw to cut off a lot of the excess wood inside the profile before starting the sanding operation. No sense in doing a lot of un-necessary work!
Stay tuned for Part 9...
Tuesday, August 22, 2017
Solar Eclipse Day in Colorado
I am lucky enough to be working for a company that is 100% full of science geeks, so Monday's eclipse was a very special time around the building. Here in Colorado, we hit 92% coverage, so it was still fun to watch.
One of my co-workers set up a pair of binoculars on a tripod to project good magnified images on a back board. I didn't need to look through any fancy specs directly at the event. Instead, I had more fun taking cel phone pictures of the projections at 15 to 20 minute intervals during the entire eclipse.
This is a picture of the observing set-up used. Makeshift, but very effective...

Ten minutes into the event....
The rock holding the back board in place is a good representation of the rogue planet NIBIRU, which is supposed to destroy the earth soon!
This pic was taken at maximum coverage in this area, approx. 11:47 a.m. MST
A cool picture showing hundreds of mini projections in the shadow of a nearby tree. This was taken slightly after maximum coverage.
I don't expect that many people took too many images of the moon's limb exiting the sun's. I'm a professed nerd, so here it is...
.
The really cool thing is these maginified projections show sunspots! A large grouping appears in lower center of the sun's disc, and a smaller group appears just next to the tiny remnant of the moon's image in this photo. Also if you enlarge this photo, you can actually see hints of the 'grainy' appearance of the sun's surface, as well as the characteristic curvature shading around the disc edges.
Yep, I may have missed out on the spectacular views of totality enjoyed by the many who traveled to be in 'The Path', but I had a very enjoyable day at work viewing 'Eclipse 2017' with all of my geek friends and co-workers!
Astronomy is nearly as fun as model rocketry!
One of my co-workers set up a pair of binoculars on a tripod to project good magnified images on a back board. I didn't need to look through any fancy specs directly at the event. Instead, I had more fun taking cel phone pictures of the projections at 15 to 20 minute intervals during the entire eclipse.
This is a picture of the observing set-up used. Makeshift, but very effective...

Ten minutes into the event....
The rock holding the back board in place is a good representation of the rogue planet NIBIRU, which is supposed to destroy the earth soon!
This pic was taken at maximum coverage in this area, approx. 11:47 a.m. MST
A cool picture showing hundreds of mini projections in the shadow of a nearby tree. This was taken slightly after maximum coverage.
I don't expect that many people took too many images of the moon's limb exiting the sun's. I'm a professed nerd, so here it is....
The really cool thing is these maginified projections show sunspots! A large grouping appears in lower center of the sun's disc, and a smaller group appears just next to the tiny remnant of the moon's image in this photo. Also if you enlarge this photo, you can actually see hints of the 'grainy' appearance of the sun's surface, as well as the characteristic curvature shading around the disc edges.
Yep, I may have missed out on the spectacular views of totality enjoyed by the many who traveled to be in 'The Path', but I had a very enjoyable day at work viewing 'Eclipse 2017' with all of my geek friends and co-workers!
Astronomy is nearly as fun as model rocketry!
Sunday, August 20, 2017
Nice Hobby Lobby Haul
Last week I stopped by the local Hobby Lobby, clutching a 40% of coupon in hand, to purchase an Estes Mercury Redstone kit.To my delight, I also found a couple of other kits marked at 40% clearance - a Nike Smoke and Super Neon. I just couldn't resist.
These new additions to my build list will keep me busy well into the winter months, at the snail's pace in which I get rocket projects completed!
-Ed
Wednesday, July 19, 2017
MPC Lunar Patrol, Part 7 - A Minor Setback
It has been quite some time since I have had a chance to resume work on the Lunar Patrol. Lot of life stuff happening since the beginning of the year.
So, last night I grabbed the booster rocket off the bench and headed for the 'BlastFromThePast Vehicle Finishing Facility' (a large cardboard box in the corner of the back yard), to apply the first coat of primer.
When I tried to insert the engine casing on the end of the painting wand into the main tube, I found it to be exceedingly difficult.
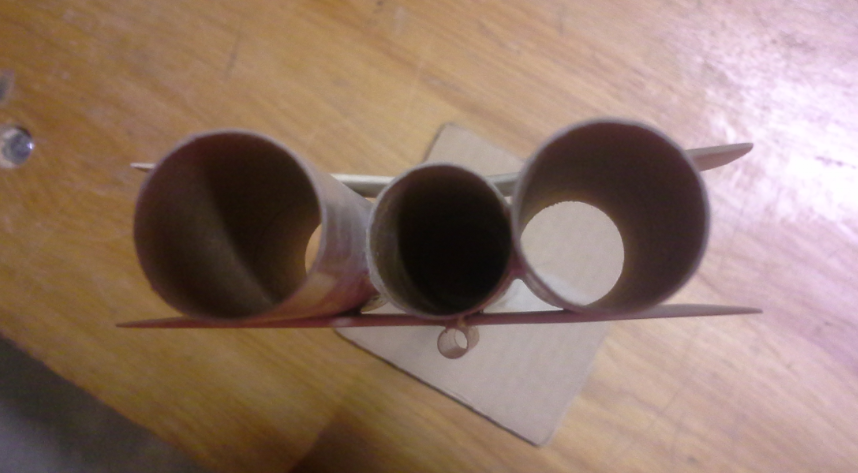
Here's why:
In this photo, it can readily be seen that the main tube is a distinct oval shape, and one of the fin units is somewhat warped.
How did this happen?
Here's the answer:
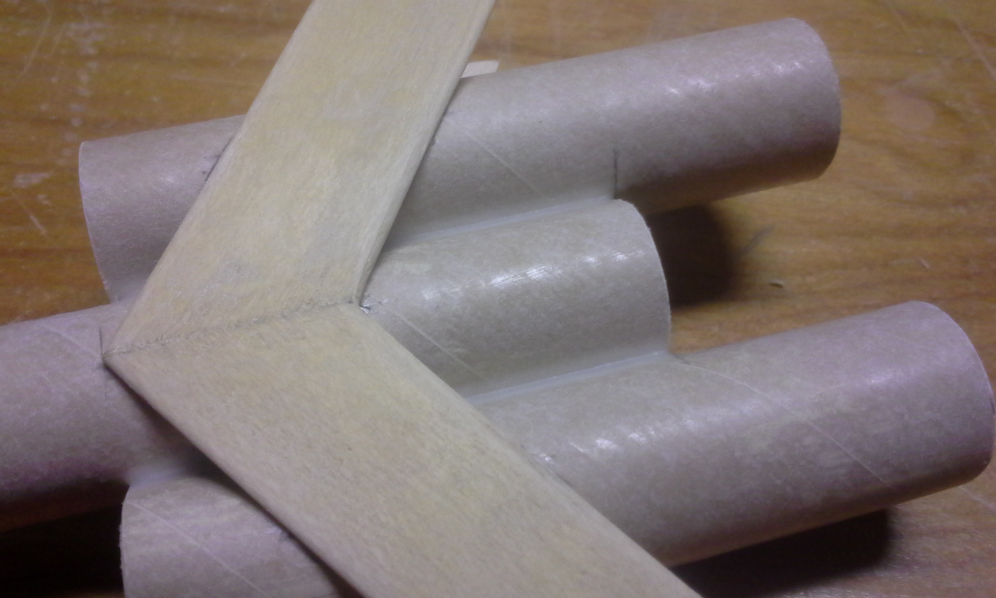
After assembling the three tubes, I had applied a very liberal set of fillets using Elmer's white glue to hide the big gaps and bubbles that invariably plague parallel-glued tubing.
This attempt to make things pretty led directly to the dreaded 'Elmer's Effect' - severe glue shrinkage that warped the body tubes completely out of round. Things are so bad that one of the gliders will no longer fit between the fin projections. To make it fit in the present condition would require inner surface of the fins to be sanded down to 1/32" thickness.
No good.
I have a couple of options here. The first is to use the 'Forced Air Thermal Alignment Apparatus' (my wife's hair drier).
The idea is to insert engine casings into all three tubes for support, then heat up the joints with the hair drier to soften the glue and allow re-alignment. It is hoped that, when things cool down, the components will retain the proper position.
If this doesn't work, I am afraid the only other course is to scrap this booster, buy another BT-20 tube, and start it all over.
Sigh.
Live and learn.
In the meantime, the filling and sanding of all those balsa glider parts is still progressing.
Subscribe to:
Posts (Atom)