For those of you who might like to try your hand at scratch building a Little Joe II model rocket in whatever scale, there was a good set of scale drawings published in the September, 1969 issue of Model Rocketry Magazine.
The plans can be found starting on page 44 in the Model Rocketeer section.
This issue of MRm can be found on Ninfinger. Here's the link:
http://www.ninfinger.org/rockets/ModelRocketry/Model_Rocketry_v01n11_09-69.pdf
Sunday, June 11, 2017
Saturday, June 10, 2017
Back In The Day, Part 5 - The Centuri Little Joe II
Over on the ‘Rocket Building Blog’, master builder Chris
Michielssen is embarking on a new build of the Estes Little Joe II kit. I am in great anticipation of this blog series,
as the LJII kit is high up on my own project list for the near future. Chris also posted a little bit of historical
info on the older Centuri and Estes Little Joe kits.
This kindled some memories of the Centuri Little Joe II
which I built and flew back in 1980-1.
This is a photo of the model prior to its maiden flight
in 1980. The date is unknown, but
judging from the snow in the picture it would have taken place between January
and March of that year.

The model was flown on a (3) C6-3 engine cluster. I recall that it was a very impressive
flight.
The model’s second and final flight took place in April
of either 1981 or 1982. My flight
documentation was quite poor back at that time.
This flight was made at a public demonstration launch at the Rustic
Hills North shopping center, an annual event conducted by ROMAR, and sponsored
by a hobby store located in the strip mall.
This flight of the LJII did not go so well – in fact it
pranged on the asphalt and was damaged beyond repair.
The model can be seen in this photo lying on the table next to the PA
box. Close scrutiny reveals the 3 engine
cluster tube assembly sitting next to the rocket, and it is obvious that most
of the fins are missing.
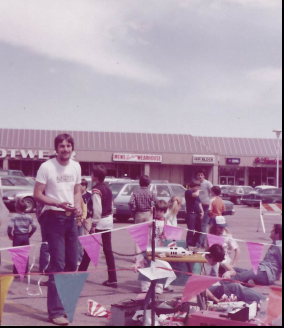
Yep, that gangly-looking young man doing the running
commentary on the PA system is me. That was in my 'hippie' days!
I never attempted to repair the LJII, and the remnant
pieces were part of my general model rocket sale in 1985.
I’m definitely stoked about building another one….
Friday, June 9, 2017
It Glid Real Good....
The other day, I was at the workbench sanding the Lunar
Patrol Glider wings after another coat of filler. Since this is a somewhat tedious job, my mind
began to wander a bit to an odd subject.
Here’s the question I posed to myself:
“If the past tense of ‘hide’ is ‘hid’,
and the past tense
of ‘slide’ is ‘slid’,
why then is the past tense of ‘glide’ ‘glided’ ?
It should be ‘glid’.
Just thinkin’…
Saturday, June 3, 2017
Launch Date: 31 May, 2017
The week following Memorial Day has been marked by
increasingly mild weather conditions along the Colorado front range. Close watch of local wind and weather
forecasts revealed that today would be an ideal day to get in a little rocket
flying., so I took a break from the endless yard work, packed up some rockets
and gear, and headed out to Dove Valley Park.
Arriving around 10:45 a.m., the first bird to be prepped and
launched was the old Hornet. The model
turned in yet another great flight on an A3-4T engine.


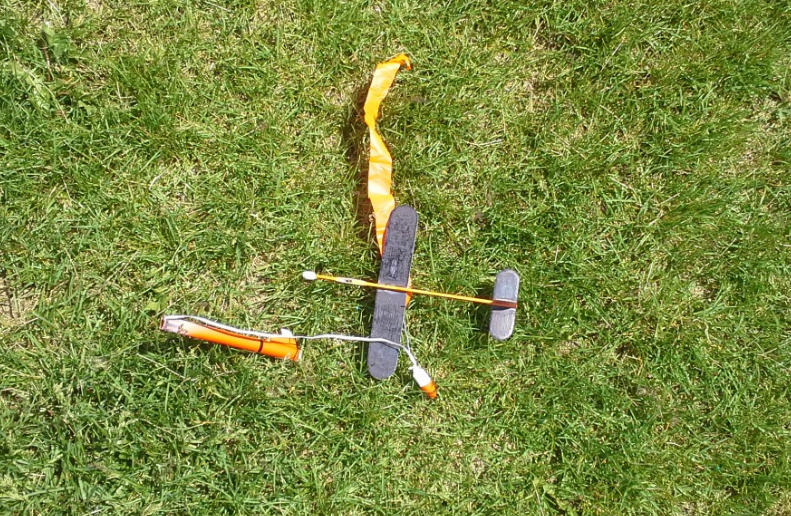
I was a bit concerned about attempting to launch this bird
on a 1/4A engine with a 3 second delay, but I opted to proceed anyway. My trepidation was confirmed at launch when
the bird ascended straight up to a little over 100 feet, turned over, and
headed straight down. It pranged just
when the ejection charge went off.


Much to my surprise, the glider survived the impact
intact. The power pod suffered only
minor bending at the fore end of the body tube.
An easy fix that will have the Mini Maggot ready to fly another day.
I think the glider can handle a 1/2A engine
which can be had with a 2 second delay.
One bright spot of this flight was the great performance of the newly
constructed glider rod and gantry system.
Since I had some spare ¼ A engines in the range box, out came
the little Mosquito for a quick flight or two.

The first launch boosted the model straight and high, and,
as expected with Mosquito flights, it disappeared after ejection. Surprisingly, I spotted the model on the turf
right away about 40’ distance from the launch pad. No extended searching this time.
I quickly had the model ready to go for a second
flight. Nice thing about Mosquitos is
the quick prep time.
Again, #105 boosted nicely.
By this time a bright, high altitude cloud had appeared overhead, so I
didn’t even see the delay and ejection smoke.
I had to rely solely on the direction of the ejection sound to get an
idea of where to start looking for the model.

This time, finding the rocket was not so easy. After a full
20 minutes of methodically searching the vicinity around the launch area, I had
no Mosquito. I did manage to find a lot
of other orange things:
An orange drinking straw,
An orange candy wrapper,
An orange foam ear plug,
Even a piece of actual orange peel!
But no (BRIGHT) orange rocket.
Vexed and perplexed, I almost gave up , but decided to make
one more circuit of the field, this time expanding the search radius by another
100 feet.
That’s when I finally found the bird…a full soccer field
length’s distance from the launch pad. It was remarkable that it had traveled
that far on a ¼ A engine!
On the long trek back to the launch area, I found this….

Doubtless left on the field after a kid’s soccer match.
“WINNER’” says the plastic medallion.
Was this a congratulatory message to me for having found the
Mosquito, or is it instead a cruel mockery of the 25 minutes spent searching?
Nevertheless, I am happy to have the Mosquito back after its
6th flight. The ‘WINNER’
award will be proudly draped around the model’s display stand back at the
workshop!
The final flight of the day was turned in by the Estes Lynx
on an A10-3T engine. This model has
always proven to be a great performer, and today’s launch was no
exception.


Ignition and boost were
perfect, but at ejection I saw no deployed parachute. The model fell fairly quickly, but in a
horizontal position with the ‘chute and shock cord tangled around the wings and
fins. The Lynx survived this little
mishap without a scratch.
With that done, it was time to pack up and leave DV park to
the sole possession of a gentleman who was out scanning the fields with a metal
detector….
Friday, May 12, 2017
MPC Lunar Patrol, Part 6
Today, I finally had some time to resume work on the Lunar Patrol.
The balsa stock for the glider nose cones has been mounted on the lathe for a few weeks now, while I have been engaged in other stuff - like massive yard work / landscaping projects. The rest of the Lunar Patrol build is on hold , waiting for completion of these nose cones.
The first step is to turn down the square corners of the pine block to which the balsa stock is mounted. I will be working in close proximity to this block, and I have no desire to have my knuckles busted by rapidly traveling square corners.

Next step is to bring the stock down to a cylinder. This is done with a normal woodturning gouge, in a series of very light passes. Balsa is quite splintery, and it's easy to take out chips and chunks if the work is done too aggressively.

Once the stock is down to around 1/8" of its target diameter, I switch to a medium grit sanding block.
Again, this needs to be done with a light touch. Balsa sands down very quickly. I stop the machine often to check my progress with a caliper set to the O.D. of a BT-20 body tube.
Once the stock is the right diameter, I use a pencil to mark out the fore and aft locations of the nose cone shoulder. Since these nose cones will eventually be glued into the LP glider tubes, I'm only going with a 5/16" shoulder length.

The shoulder diameter is then turned using a straight file, and the nose cone profile is shaped using sanding blocks. Again, the machine must be stopped often to check the profile with a template.

Finally finished. The completed nose cone gets separated using a razor saw while the machine is spinning.

A few minutes later: two completed Lunar Patrol nose cones!
 Stay tuned for part 7 !!!!!
The balsa stock for the glider nose cones has been mounted on the lathe for a few weeks now, while I have been engaged in other stuff - like massive yard work / landscaping projects. The rest of the Lunar Patrol build is on hold , waiting for completion of these nose cones.
The first step is to turn down the square corners of the pine block to which the balsa stock is mounted. I will be working in close proximity to this block, and I have no desire to have my knuckles busted by rapidly traveling square corners.

Next step is to bring the stock down to a cylinder. This is done with a normal woodturning gouge, in a series of very light passes. Balsa is quite splintery, and it's easy to take out chips and chunks if the work is done too aggressively.

Once the stock is down to around 1/8" of its target diameter, I switch to a medium grit sanding block.
Again, this needs to be done with a light touch. Balsa sands down very quickly. I stop the machine often to check my progress with a caliper set to the O.D. of a BT-20 body tube.
Once the stock is the right diameter, I use a pencil to mark out the fore and aft locations of the nose cone shoulder. Since these nose cones will eventually be glued into the LP glider tubes, I'm only going with a 5/16" shoulder length.

The shoulder diameter is then turned using a straight file, and the nose cone profile is shaped using sanding blocks. Again, the machine must be stopped often to check the profile with a template.

Finally finished. The completed nose cone gets separated using a razor saw while the machine is spinning.

A few minutes later: two completed Lunar Patrol nose cones!

The FireFly Re-Visited
Last night, I had a little spare time on my hands, so I sat
down at the rocket bench to repair the Firefly glider, which had suffered a
broken attachment pin on its May 5th maiden flight.

As I was gluing the piece back on, I took a closer look.
This little piece of balsa is certainly required to do a lot.
First, it has to bear the G-forces acting on the glider at liftoff.
Next, it handles the weight of all the drag forces acting on
the glider during boost and coasting phases of flight.
Then, it has to withstand any shock forces associated with
engine ejection and glider separation.
Finally, it is always the first point of contact on the
ground after gliding flight, i.e., the model’s ‘landing gear’.
That’s an awful lot to ask of a little sliver of balsa wood.
I realized that, if I didn’t want to be repairing this
attachment pin after each and every flight, some engineering needed to be done
to remedy this weak point.

Drawing on pop-pod boost/glider technology, I decided that
the best course would be to apply some reinforcing sides on the pylon/pin
assembly.
For this, I cut out a couple pieces of 1/32” thick plywood.
After sanding down the dowel pin to match the thickness of
the glider’s nose, I wrapped a piece of sandpaper around a ¼ “ dowel and carved
out a little hollow in the nose to make a cavity for holding a glob of trim
clay. This will cut down on the amount
of clay that normally has to be molded around the outside of the nose for
proper flight trimming.
The plywood sides are then glued on, shape sanded, and
finished to match the rest of the model.
With this new design modification, it is hoped that the
firefly will log many more flights without losing its nose every time!
Wednesday, May 10, 2017
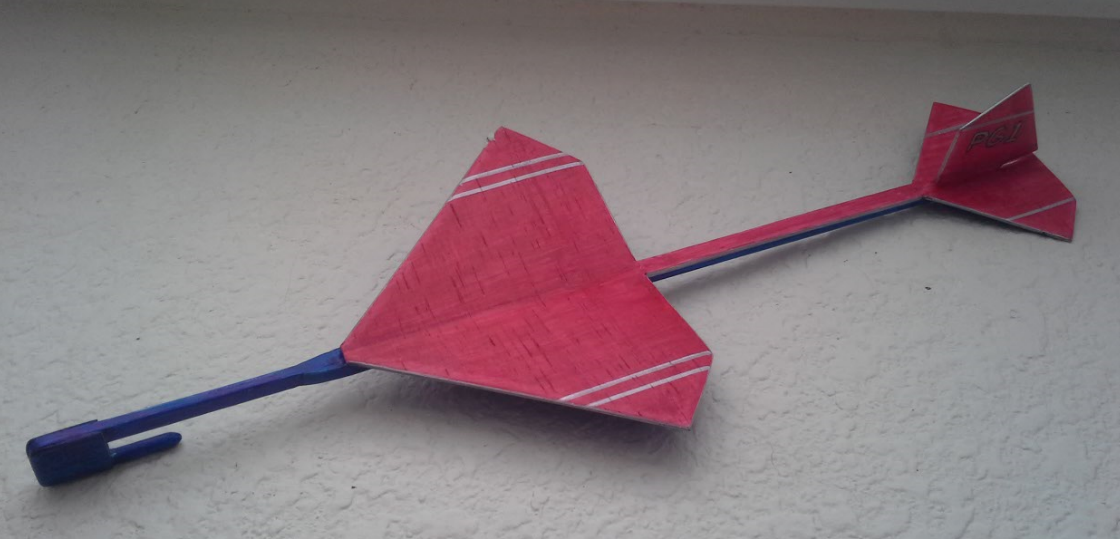
BAR Rocket Fleet # PG-1 Firefly-B
Parasite Glider
Rebuild of Estes Kit #
1280

Length: 12.0”
305mm
Wing Span: 4.5”
114mm
Weight: .16 oz
4.6g
Color Scheme: Red,
Dark Blue, Silver Trim
Date Completed:
12 April, 2017
“Hey…
...This One’s BUTT Don’t Light Up !!!”
The Firefly-B is a re-build of the original Estes
Industries kit first introduced in 1976.
It’s not a certainty, but the glider design appears to have been adapted
from an earlier ‘Cold Power’ rocket kit produced by Vashon Industries, the X-13
Rocket Plane. Vashon products were bought out by Estes and first appeared in
their 1972 catalog.
It is also Estes’ first model kit designed without its
own rocket power source, as it is intended to be flown attached to a different
carrier rocket.
The Firefly is a very quick and easy build, featuring a
balsa T-boom, delta wings and tail, and a forward dowel attachment pin.
The small aspect ratio of the wings takes the Firefly’s
performance out of any competition-grade flight characteristics, but it does
make for a fun-to-fly sport bird.

The model was built per kit instructions and was finished
with a single coat of Dupli-color white primer, well-sanded, and color coats
rendered by Sharpie markers to keep overall weight down.

Trimming the Firefly for gliding flight is a rather
tricky process. It is sensitive to very small differences in angle of attack
when hand launching. It also takes a
fair amount of trim clay on the nose to get it to settle into a smooth glide
pattern without stalling.
My original ‘old fleet’ Firefly (# 55) was constructed in
1976. It turned in six flights – two on
a custom designed carrier rocket, and the remaining four strapped to the side
of a Big Bertha.
  |
Right: Just me n' my Firefly.
This was a 1978 launch with the glider strapped to the side of a shortened
Big Bertha
|
This original model was sold with the rest of the fleet in 1985.
Subscribe to:
Posts (Atom)