Friday, September 15, 2017

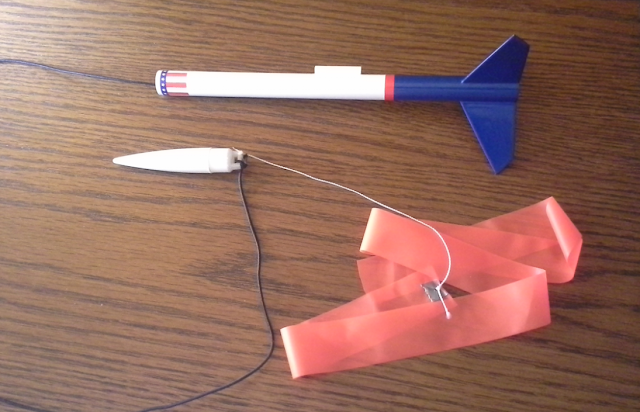
BAR Rocket Fleet #111 Super-Star


Sport Model
High Performance
MPC Kit Clone
Designed by G. Harry Stine
Date Completed:  14 September, 2017

 Designed for 13mm mini engines
Length:  254mm
Diameter:  13.7mm
Weight:  10.2g
Fins: 3
Nose cone: Tangent ogive,   Approx.  4.1 Caliber
Color scheme: white, dark blue with red and dark blue trim

 The construction of this model began back in July of 2016, shortly after I became a BAR.  At the time, I had gathered the parts to build several mini engine birds in parallel.  The Super-Star was one of them, but the project eventually got pushed to the back of the workbench in favor of other rocket builds.
Even though this is a standard 3FNC model rocket, I reasoned that no fleet should be complete without a high performance Stine-designed bird.
The original kit was introduced back in 1971 as part of MPC’s Mini-Roc product offering. These birds were powered by a new line of 13mm engines in the 1/2A to B total impulse ranges.   At the time, competition modelers using these new minimum diameter 13mm birds and engines essentially re-wrote the NAR record books, especially in the low-power altitude categories.  The Super-Star was easily capable of an ‘out-of-sight’ flight on a B3 engine.
My build started with the plans being downloaded from the ‘Ye Olde Rocket Plans’ website, and dimensioned around an Estes BT-5 body tube.  I really enjoyed reading through the kit instructions.  They were obviously written by Mr. Stine himself –full of, well…Stine-isms!  It was as if one was reading a chapter straight out of the Handbook of Model Rocketry, except it was dedicated to a single model design.
Construction was fairly straight forward.  Initially, I had intended to turn the nose cone on the lathe, but I plopped on a spare Estes PNC-5AW cone I happened to have hanging around, and found that it would be quite serviceable.  Of course, this takes the model out of the ‘exact replica’ category, but I’m not overly concerned about that.
A small amount of clay weight was pressed and CA’d into the tip of the nose cone to give the bird a little more front-end ‘ballast’.
Since I am strictly a sport flier, I opted not to sand an airfoil into the fins, rounding the edges instead.  I also slapped on a standard launch lug.  This bird will go plenty high enough for my purposes without all of the performance optimizations.

 A DECAL TRIUMPH

 The decals used to decorate the Super Star came from the red, white, and blue sheet in the current Estes waterslide kit. 
I did try one thing that was really a test of my eyesight and manual dexterity – the digits making up the fleet number (111) were cut from the corner of one of the Estes decal sheets.  These were part of the tiny lettering that makes up the sheet product number and date.  The numbers are around 2mm in height.  It was no easy task to get them cut from the sheet, immersed in water, and positioned correctly on the model.   A magnifier lamp, micro-tip tweezers, and an Xacto blade came into heavy play here.  
The endeavor worked out pretty well for a 60+ year old guy who has to wear reading glasses in order to see anything at all!

Overall, the Super-Star build produced a nice looking bird that I am proud to have in my fleet.  It will definitely be on the launch pad at the very next flight session.


Thursday, September 14, 2017

A REAL Blast From The Past...

One of my early childhood memories is that of a Nike Hercules missile that was on display in downtown Colorado Springs where I grew up..  I remember always being thrilled whenever I was in the car with my folks and we happened to drive by that missile. 
Of course, being around 3-5 years old, I knew nothing of military missiles.
In my eyes, this thing was an honest-to goodness SPACESHIP! 
I was quite convinced that the little access hatch on the side of the rocket was a door for miniature spacemen!
 I was also completely unaware that, at the time, a group of people in nearby Denver, and even in my home town of Colorado Springs were quite busy laying the groundwork for a model hobby involving missiles, rockets, and spaceships. 
Not to mention that a mere dozen or so years later, I would be deeply immersed in that hobby myself!
Or that another 40 or so years hence, I would still be deeply immersed in that hobby.
So, just the other day, I was thinking about that Nike Hercules missile which sparked my imagination so many years ago.  I knew that the vehicle had disappeared from display sometime in the late 1960's, and I wondered whatever became of it.
A quick search on the Wonderful World Wide Web revealed that there is a Nike Hercules currently on display at the Peterson AFB Air and Space Museum in Colorado Springs.  I wondered if this could be the same missile.
I found a website for the Museum, and shot them a quick e-mail inquiring if this was the same vehicle.
I got the response this morning....

"Mr. Mitton,

You are correct, our display Nike Hercules was presented to El Paso County in July 1959 by the US Army Air Defense Command, headquartered at Ent Air Force Base, and on display in front of the El Paso County Courthouse (now the Colorado Springs Pioneer Museum) for a number of years.  It came into our possession in the late 1970's when the North American Air Defense Command established a Visitor Center on then-Peterson Field in 1976.  The NORAD Visitor Center was replaced with the Peterson Air and Space Museum when the museum was established in 1981.

I've attached a photo of the bronze plaque that was part of the Nike missile display when it was located downtown."

Cool!

Here is a picture of the plaque...


and of the Nike Hercules itself on display at the museum...


Cheers!

Wednesday, September 6, 2017

MPC Lunar Patrol, Part 9, Booster Assembled

It's back to the workbench to plug away at the Lunar Patrol Build.
For starters, I procured Mrs. BlastFromThePast's hair drier to attempt a fix for the body tube warping mentioned a few posts back.
Placing expended engine casings in all of the effected tubing for support, the assembly was hit with hot air to soften the glue.
It worked.
Now the  model is the correct shape.  An engine fits nicely in the center tube, and the gliders fit much better between the fins.
The last items to attach now are the two half-inch sections of launch lug inside the glider support tubes.

These function to center the gliders and provided extra support to the edge of the tubes.
Construction is now complete on the booster rocket. 

 
Next step is shooting primer and performing additional surface prep for painting.

Monday, September 4, 2017

A Nifty-Keen Rocket Building Bench Accessory

Happy Labor Day!
This morning I got up and headed down to the shop to knock together a project for the work bench.
I have this unused Flat Screen TV stand banging around in the basement, and recognized it as a perfect benchtop stand for doing close-up detail work on model rocket components.

Pulling out my vintage hand tools, I set to work....
First, an appropriate sized piece of 1/2" birch plywood was cut out to make the work surface.
A little work with a hand plane and file to clean up the cut edges.

Once the piece is marked for centering on the mounting plate, I had to mark out and drill a few recess holes to accommodate some mounting screws and metal guide pins.

Now the plywood work surface gets attached with a few flathead wood screws.

Almost done.
As a finishing touch, a wooden stop bar will be added to the lower edge of the work surface to keep things from rolling and sliding off.  A paint stir stick from the BORG will serve nicely for this.  This particular stick has the added feature of an inch scale printed on it.
Cut to length...

Drill, countersink, and mount with some more flathead screws...

And, voila!..a very useful assembly accessory.
Coupled with a mag. light, it is just the ticket for doing some of that close up detail work.

Cheers!